How to Check Blood Pressure at Home: A Step-by-Step Guide
Monitoring your blood pressure outside of a clinical setting is one of the most effective ways to manage your cardiovascular health. In-office readings can sometimes be misleading due to the stress of a doctor's visit—a phenomenon known as "White Coat Hypertension." By learning how to check blood pressure at home, you can provide your physician with a much more accurate picture of your daily baseline.
However, getting an accurate reading requires more than just strapping on a cuff and pressing a button. This guide will walk you through the exact steps recommended by the American Heart Association (AHA) to ensure your home readings are precise and reliable.
1. Choose the Right Equipment
The foundation of accurate tracking is a reliable monitor. Avoid wrist and finger monitors, as they are notoriously prone to errors caused by body positioning. Instead, invest in an FDA-cleared, automated bicep (upper-arm) monitor.
Ensure the cuff fits correctly. If the cuff is too small, it can artificially inflate your reading; if it is too large, it may result in a falsely low reading. Most standard monitors come with a medium-to-large cuff that fits the average adult arm, but always check the sizing chart.
2. Prepare Your Body for the Test
What you do in the 30 minutes leading up to your reading heavily influences the result. To get an accurate baseline, follow these preparation rules:
- Empty your bladder: A full bladder can temporarily raise your systolic pressure by up to 10-15 mmHg.
- Avoid stimulants and exercise: Do not consume caffeine, alcohol, or use tobacco products for at least 30 minutes before measuring. Avoid rigorous physical activity as well.
- Rest: Sit quietly in a comfortable chair for 5 full minutes before pressing the start button. Do not scroll through your phone or watch stressful television during this time.
3. Perfect Your Posture and Arm Placement
Your physical posture during the test is critical. A slumped back or crossed legs can severely skew your numbers.
The Ideal Measurement Posture:
- Back: Sit in a dining or office chair with excellent back support. Do not sit on a soft sofa.
- Legs & Feet: Keep both feet flat on the floor. Never cross your legs or ankles, as this restricts blood flow and raises pressure.
- Arm: Rest your arm on a flat surface (like a table or desk) so that your bicep is perfectly level with your heart.
- Cuff Placement: Place the cuff on your bare arm, about one inch above the bend of your elbow. The tubing should fall over the front center of your arm.
4. Take the Measurement
Once you are in the correct position, press start. Remain completely silent while the cuff inflates and deflates. Talking—even whispering—can elevate your reading.
The AHA recommends taking two or three readings, spaced exactly one minute apart, and calculating the average. Your first reading is often the highest due to initial anticipation.
What to Do With Your Numbers
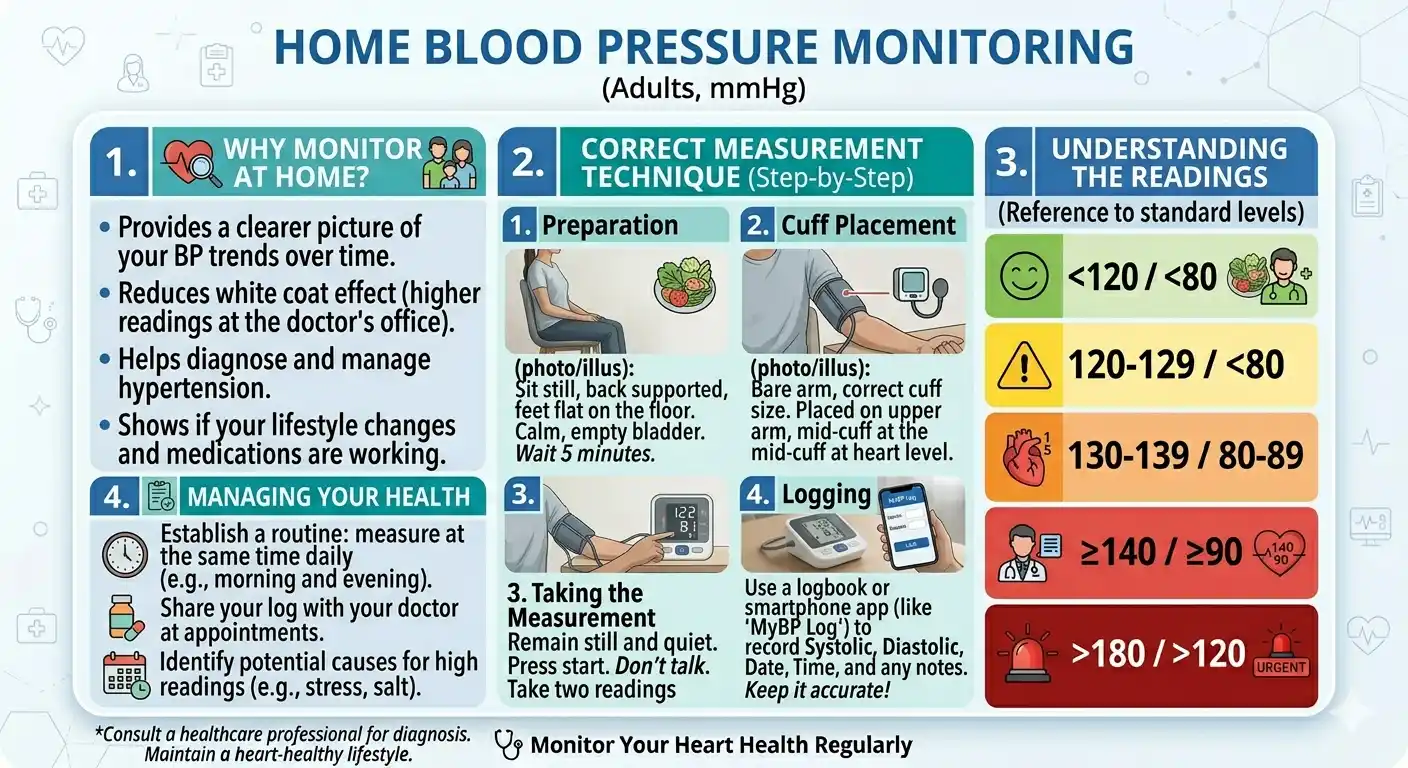
Once your machine displays your systolic (top) and diastolic (bottom) numbers, you need to know what they mean. Instead of guessing, you can use a digital tool to instantly interpret your risk level based on the latest medical guidelines.
Got your numbers? Enter them below for an instant health assessment:
Enter Numbers into the BP CalculatorIf you are unsure about the different medical categories, you can also read our detailed breakdown on the Normal Blood Pressure Range.
Frequently Asked Questions (FAQs)
Medical Disclaimer: The information provided on this website is strictly for educational purposes and should not replace professional medical advice, diagnosis, or treatment. Always consult a licensed healthcare provider regarding your blood pressure readings and treatment plan.